rolanstar computer desk assembly instructions pdf
Welcome to the Rolanstar computer desk assembly guide. This comprehensive guide provides step-by-step instructions to help you efficiently build your Rolanstar desk with ease.
1.1 Overview of the Rolanstar Computer Desk
The Rolanstar computer desk is a stylish and functional workspace solution designed for home or office use; Built with durable materials like steel and engineered wood, it offers a sturdy and modern design. The desk features a spacious surface area, ergonomic design, and optional storage compartments for organization. Its adjustable height settings and cable management system enhance comfort and productivity. Easy to assemble and customize, the Rolanstar desk is perfect for creating a efficient and comfortable workspace that meets your needs.
1.2 Importance of Following Assembly Instructions
Following the assembly instructions for your Rolanstar computer desk is crucial for ensuring safety, correct assembly, and efficiency. Properly assembling each component prevents mistakes, damage to parts, and ensures the desk’s stability and longevity. By adhering to the guidelines, you can avoid common pitfalls and achieve a professional-grade setup, maximizing both functionality and aesthetics. This careful approach guarantees that your Rolanstar desk will provide years of reliable service and meet your workspace needs effectively.

Safety Precautions and Preparation
Ensure a safe assembly process by working in a well-lit area, wearing protective gloves, and keeping loose clothing tied back. Clear the workspace of obstacles and fragile items. Always handle tools and hardware with care, avoiding over-tightening, which may damage components. Follow all safety guidelines to prevent accidents and ensure a smooth assembly experience.
2.1 General Safety Tips for Assembly
Always wear safety glasses and gloves to protect yourself during assembly.
Ensure the workspace is clear of clutter and well-lit to avoid tripping hazards.
Use the correct tools for each task to prevent damage to components or injury.
Follow the instructions step-by-step and avoid skipping ahead.
Keep loose clothing and long hair tied back to prevent entanglement.
Avoid over-tightening bolts or screws, as this may damage the desk frame.
Check for any damaged or sharp edges on parts before handling them.
Keep children and pets away from the assembly area for their safety.
Take regular breaks to avoid fatigue and maintain focus during assembly.
2.2 Workspace Preparation and Tools Needed
Clear a flat, sturdy work surface, such as a table or floor, to accommodate the desk components.
Lay down a protective covering like cardboard or a drop cloth to prevent scratches.
Gather all required tools, including a screwdriver, Allen wrench, and pliers, before starting assembly.
Organize the hardware and components by type to ensure easy access during assembly.
Keep the instruction manual within reach for quick reference.
Ensure good lighting to see small parts and instructions clearly.
Remove any jewelry that might interfere with handling tools or components.
Have a trash bag nearby for packaging materials.
Set aside approximately 2-3 hours for the assembly process.
Gathering Tools and Parts
Before starting, collect all tools and components listed in the manual.
Verify each item against the inventory list to ensure nothing is missing.
Organize parts and tools neatly to streamline the assembly process.
This step ensures efficiency and prevents delays during construction.
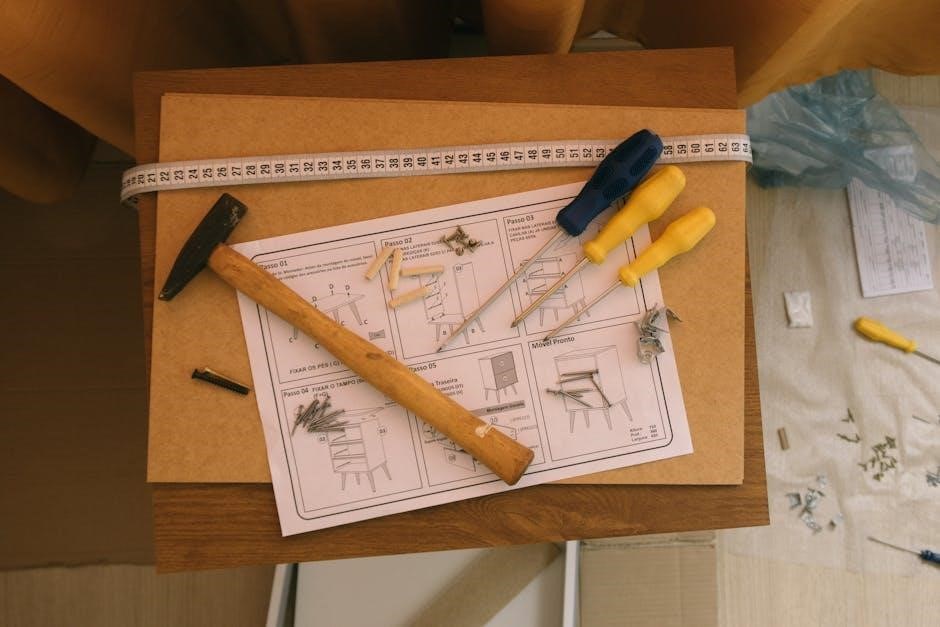
3.1 List of Required Tools
To assemble your Rolanstar computer desk, gather the following essential tools:
- A Phillips-head screwdriver for driving screws.
- An Allen wrench (3mm and 5mm) for bolts.
- Pliers for gripping small parts.
- A rubber mallet to tap pieces into place gently.
- A tape measure to verify alignments.
- A level to ensure the desk is even.
Having all tools ready will streamline the assembly process and prevent delays.
3.2 Inventory of Desk Components and Hardware
Before starting, verify all components are included in your Rolanstar desk package. This includes:
- Desk frame and legs.
- Tabletop surface.
- Drawer units and slides.
- Shelves (if applicable).
- Hardware kit with screws, bolts, and clips.
Check for any missing or damaged items and ensure all parts are accounted for. Organize components by category for efficient assembly.
Assembling the Desk Frame
Start by unpacking and organizing the frame components. Carefully construct the base, attach the legs, and ensure all connections are secure. Work on a flat, stable surface and use a rubber mallet to avoid damaging parts; Follow the sequence outlined in your Rolanstar instructions for a sturdy foundation.
4.1 Unpacking and Organizing the Frame Components
Begin by carefully unpacking the desk frame components from the packaging. Inspect each part for damage or defects. Lay out all pieces on a flat, stable surface. Group similar components together, such as legs, crossbars, and brackets, to streamline the assembly process. Refer to the instruction manual to identify each part accurately. Use a label maker or markers to tag components for easy reference. This step ensures a smooth and efficient assembly experience.
4.2 Attaching the Legs to the Desk Frame
Align the desk legs with the pre-drilled holes on the frame. Secure each leg using the provided bolts, ensuring they are tightly fastened. Use a wrench or screwdriver to tighten evenly. Double-check the alignment to prevent wobbling. Refer to the manual for specific bolt types and torque specifications. Once all legs are attached, gently rock the frame to ensure stability. Properly secured legs are essential for a sturdy and level workspace.
4.3 Aligning and Securing the Frame
Use a spirit level to ensure the desk frame is even. Tighten all connections firmly to avoid instability. Check the alignment of the frame’s edges and corners for accuracy. If necessary, adjust the legs or frame slightly to achieve proper alignment; Refer to the manual for specific torque values for bolts. Once aligned, perform a final tightening of all screws and bolts. Test the frame’s stability by gently rocking it side to side and front to back to ensure it is secure and level.
Assembling the Tabletop
Assembling the tabletop requires care and precise alignment to ensure stability and a professional finish. Follow the manual for exact placement and securement instructions.
5.1 Placing the Tabletop on the Frame
Begin by carefully aligning the tabletop with the pre-drilled holes on the desk frame. Ensure the tabletop is centered and evenly spaced on all sides. Gently lower it onto the frame, making sure it sits flush. Double-check the alignment to avoid any shifting. Once properly positioned, proceed to secure it in the next step. Handle the tabletop with care to prevent damage or injury, as it may be heavy. This step is crucial for ensuring stability and proper assembly.
5.2 Securing the Tabletop with Screws
After aligning the tabletop, insert the screws into the pre-drilled holes. Tighten them evenly, starting from the center and working outward to prevent warping. Use the correct screwdriver bit to avoid stripping the screws. Ensure each screw is snug but not overtightened to prevent damage. Double-check that all screws are securely fastened for stability. If needed, apply a small amount of adhesive for extra stability, but avoid overapplication. Finally, test the tabletop’s sturdiness by gently applying pressure to ensure it is firmly attached and level.

Assembling the Drawers and Storage Units
Organizing and assembling the drawers and storage units is a crucial step. Gather all components, follow the guide, and ensure each part fits securely. Check hardware before starting and proceed methodically to avoid errors.
6.1 Assembling the Drawer Components
Begin by unpacking and organizing all drawer components, including slides, frames, and panels. Attach the drawer slides to the frame using the provided screws, ensuring proper alignment. Next, assemble the drawer bottom and sides, securing them with the correct hardware. Carefully align the back and front panels, ensuring a snug fit. Double-check all connections for stability and even movement. This systematic approach guarantees a sturdy and functional drawer system, ready for installation into the desk.
6.2 Installing the Drawers into the Desk
Align the pre-assembled drawers with the desk frame, ensuring the slides match up perfectly. Gently slide the drawer into position, guiding it until it stops. Secure the drawer by tightening the screws provided, ensuring stability. Double-check the alignment and movement by sliding the drawer in and out. Repeat for additional drawers, maintaining even spacing and proper fit. Avoid over-tightening to prevent damage to the slides or frame.
Assembling the Shelves
Assembling the shelves involves attaching the shelf boards to the support frames. Ensure proper alignment and secure them firmly with the provided screws. This step ensures stability and durability.
7.1 Attaching the Shelves to the Desk Frame
To attach the shelves, align the shelf brackets with the pre-drilled holes on the desk frame. Use the provided screws and an Allen wrench to secure them tightly. Ensure the shelves are level and properly aligned before tightening all screws. Double-check the fit to avoid any wobbling or misalignment. Once secured, test the shelves by gently applying pressure to confirm stability.
7.2 Adjusting the Shelf Height and Alignment
Once the shelves are attached, adjust their height by loosening the shelf pins or adjustment screws. Use an Allen wrench to fine-tune the position, ensuring the shelves are level. Align the shelves evenly, checking with a spirit level for accuracy. Tighten all adjustment screws firmly to secure the shelves in place. Test the shelves by gently pressing down to ensure stability and proper alignment. Make final adjustments as needed for optimal placement and balance.

Connecting the Cable Management System
To connect the cable management system, attach cable ties to the desk frame and route cords through the provided grommets. Ensure all cables are neatly organized and secured.
8.1 Installing Cable Grommets and Clips
Begin by identifying the pre-drilled holes for cable grommets on the desk frame. Peel the adhesive backing and press the grommets firmly into place. Ensure they are aligned properly for cable access. Next, insert the cable clips into designated slots or screw them into the frame. Tighten any screws to secure the clips. These components will help manage cords neatly, preventing tangles and improving workspace organization. Make sure all cables can pass through the grommets and clips before finalizing their placement.
8.2 Organizing Cables for a Clean Setup
Route all cables through the installed grommets and clips to keep them tidy. Use cable ties to bundle wires together, ensuring they are not too tight to avoid damage. Secure the ties to the desk frame or nearby clips for a neat appearance. Leave some slack for easy access and future adjustments. Labeling cables can help identify their purpose, making maintenance easier. Finally, tuck any excess cable length out of sight to achieve a clean and professional-looking workspace setup.
Final Assembly and Adjustments
Ensure all components are securely attached and properly aligned. Tighten any loose bolts and verify the desk’s stability. Make necessary adjustments to achieve a level surface.
9.1 Tightening All Bolts and Screws
Tightening all bolts and screws is crucial for ensuring the desk’s stability and durability. Use the provided Allen wrench or screwdriver to secure all connections firmly. Check every joint, leg, and frame component to ensure they are tightly fastened. Apply even pressure to avoid stripping screws. Double-check all hardware to confirm nothing is loose. This step is essential before testing the desk’s stability and placing any equipment on it.
9.2 Testing the Stability of the Desk
Once all bolts and screws are tightened, test the desk’s stability by gently shaking it from side to side and front to back. Apply moderate pressure to ensure there is no wobbling or movement. Place a heavy object, like a computer monitor, on the desk to simulate real-world use. Check for any signs of instability or creaking. If the desk feels unsteady, inspect the joints and tighten any loose connections using the provided tools. A stable desk ensures safe and reliable performance.
Tips for a Smooth Assembly Process
Read the instructions thoroughly before starting and organize all parts and tools. Work methodically, following each step carefully to avoid mistakes and ensure a successful assembly experience.
10.1 Working with a Partner for Efficiency
Working with a partner can significantly simplify and speed up the assembly process. Divide tasks evenly, with one person focusing on reading instructions while the other handles physical assembly. This teamwork ensures better handling of larger or heavier components, reduces the likelihood of mistakes, and makes the process more enjoyable. A second pair of hands can also provide additional support when aligning parts or tightening bolts, enhancing overall efficiency and safety.
10.2 Using the Correct Screwdriver Bits
Using the correct screwdriver bits is essential for a smooth assembly process. Refer to the manual for the specific bits required, such as Phillips, Allen, or flathead. Using the wrong bit can damage screws, strip heads, or scratch surfaces. Always ensure the bit fits securely in the screwdriver and the screw head to maintain control and avoid accidents. This will help prevent stripped screws and ensure a secure, professional-looking assembly. Proper tools make the task easier and safer.

Troubleshooting Common Issues
Troubleshooting common issues during assembly ensures a smooth process. Identify misaligned parts, loose connections, or missing components early to avoid disassembly. Refer to the manual for solutions.
11.1 Identifying and Resolving Alignment Problems
Alignment issues can cause uneven surfaces or wobbling. Check if all parts fit snugly and refer to the manual for correct positioning. Ensure all bolts are tightly secured. Use a spirit level to verify evenness. If components misalign, gently tap them into place or adjust the frame. Double-check hardware placement and tighten any loose connections. Proper alignment ensures stability and prevents future damage to the desk or its components.
11.2 Dealing with Missing or Damaged Parts
If you discover missing or damaged parts, stop assembly immediately. Double-check all boxes to ensure the item wasn’t overlooked. Contact Rolanstar customer support for replacements. For damaged components, assess if they can still function safely. If a part is slightly bent or chipped but still usable, proceed cautiously. Otherwise, wait for a replacement. Avoid using substitute parts, as they may compromise the desk’s stability. Addressing these issues promptly ensures a secure and functional assembly process.

Final Inspection and Cleanup
Inspect all components to ensure proper assembly and stability. Tighten any loose bolts or screws. Clean up all packaging materials and dispose of them responsibly.
12.1 Checking for Proper Assembly
Once assembly is complete, inspect all components to ensure they are securely attached and properly aligned. Verify that all screws, bolts, and hardware are tightened firmly. Check the frame, tabletop, drawers, shelves, and cable management system for stability and functionality. Ensure all parts are free from damage or misalignment. If any issues are found, refer back to the instructions to correct them. This step ensures your desk is safe and functional for everyday use.
12.2 Disposing of Packaging Materials
After completing the assembly, carefully dispose of all packaging materials. Recycle cardboard, plastic, and Styrofoam whenever possible. Properly discard any protective films or wrapping materials. Ensure all hazardous materials, such as batteries or electronics, are disposed of according to local regulations. Keep the workspace clean and organized by removing all debris. This step helps maintain a safe and tidy environment while promoting environmental responsibility. Dispose of materials responsibly to minimize waste and reduce environmental impact.
Congratulations on completing the Rolanstar computer desk assembly! Your effort and attention to detail have successfully brought this project to life. Enjoy your new workspace!
13.1 Summary of the Assembly Process
Assembling the Rolanstar computer desk involves organized steps, from unpacking and preparing tools to securing the frame, attaching components, and final adjustments. Each phase requires attention to detail to ensure stability and functionality. By following the instructions systematically, you can efficiently complete the assembly and enjoy a sturdy, well-organized workspace tailored to your needs.
13.2 Enjoying Your New Rolanstar Computer Desk
With the assembly complete, you can now enjoy your Rolanstar computer desk, designed to enhance your productivity and comfort. Its sturdy construction and sleek design create a personalized workspace that meets your needs. Whether for work, study, or creativity, this desk offers functionality and style, ensuring a seamless experience. Take pride in your accomplishment and make the most of your new, organized workspace tailored to your daily activities and preferences.